Timesheets MTS Software ..... your source for accurate, cost effective, and easy to use timesheet and time tracking software

Home
A weblog from the authors of Timesheets MTS and Timesheets Lite, cost effective timesheet and time and billing software

Recently in Tips and Tricks Category

Editing Another Employees Timesheet

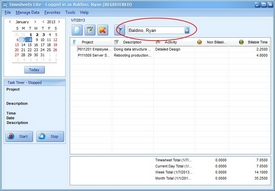
A recent release of our employee timesheet software Timesheets Lite added the ability for some users to edit other employee timesheets. Above you can see a screenshot of the employee timesheet with the employee timesheet dropdown highlighted in red.

If the logged in employee is a super user (see here for a discussion on employee security levels in Timesheets Lite) then they'll be able to select other employees names from the dropdown. When another employee is selected their timesheet data will be displayed. That data can then me added to, edited, or deleted exactly the same as the employee's own data. The task timer cannot be used to record time for another employee. This is the only real restriction on working with another employees data.


By Mark Nemtsas at 1:27 PM

I've just posted up four new pages into the Timesheets Lite Online Help File. These pages cover four reports, the Common Activity Report, the Detailed Activity Report, the Employee Timesheet, and the Internal/External Hours Report. I'll be adding help file pages for the balance of the reports in the next week or so.


By Mark Nemtsas at 2:53 PM

Users of Timesheets Lite with long project lists will often find a project quickly in the project drop down list on the Add / Edit Times screen by typing the first few characters of the project number. This works fine in most cases but some employees may prefer to auto-match their projects by project name rather than project number. To allow this it's quite simple to hide the projects in the project drop down list. Here's the steps to follow:


Hide Project Numbers Popup Menu


  • Load up the Add/Edit Time screen from the timesheet and then right click on the project drop down box. A small popup menu will appear. See the image above for what this looks like.

  • Click on the Hide Project Numbers menu and the project numbers in the project drop-down will then be hidden (see the image below).


Project Numbers Hidden in Drop-Down

To show the hidden project numbers again it's just a matter of right clicking on the project drop-down again and clicking the "Show Project Numbers" menu option.


By Mark Nemtsas at 2:17 PM


February 29, 2012

Registering Timesheets Lite


When you purchase Timesheets Lite you'll get an email from us containing your registration details. These details can be entered on the Help->Registration screen of Timesheets Lite. Your registration email will look something like the image below.


Timesheets Lite Registration Email

The basic process for registering the software is as follows:

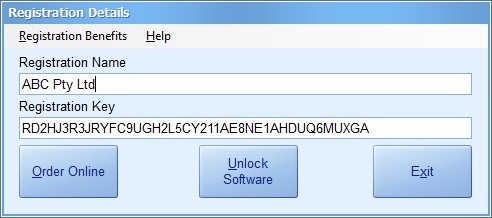
  1. Start up Timesheets Lite and go to the Help->Registration screen.
  2. Copy the Registration Name from the email and paste it to the Registration Name field in Timesheets Lite.
  3. Copy the Registration Key from the email and paste it to the Registration Key field in Timesheets Lite.

  4. Timesheets Lite Registration Email
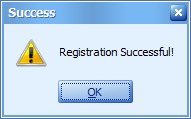
  5. Once you're happy with the details click the Unlock Software button. If you've entered the registration information correctly you'll get a registration successful message (see below).

  6. Registration Successful!

Timesheets Lite also offers a quicker and easier way of registering the software. If you want to try this method here are the steps:


Timesheets Lite Registration Email
  1. Copy the Registration License shortcut text from the registration email. This is highlighted in the email above. This text starts with **being cut here** and ends with the text **end cut here**.
  2. Start up Timesheets Lite and go to the Help->Registration page. Timesheets Lite will detect the Timesheets Lite registration information in the Windows Clipboard and show you the prompt below.

  3. Registration Details Detected
  4. Click Yes and the Registration screen will be shown with the Registration Name and Registration Key fields already filled in for you!
  5. Click the Unlock Software button you'll get a registration successful message.

By Mark Nemtsas at 1:10 PM

Based on my experience on working with contractors it is not all that unusual to receive an invoice for every project they happen to be working on with you. In some cases this isn't a bad thing and actually makes your ( the customers) internal accounting procedures a little easier. Of course some customers don't like getting one invoice for every project and would prefer to receive one invoice bundling up charges for all projects that you, as the consultant, are working on. Timesheets MTS allows you to use either of these two methods. In a nutshell here's how to do it:

  1. Log into Timesheets MTS with a user account that can generate invoices (financial user or super user) and go to the Invoices screen (using the main toolbar).
  2. Click the New Invoice button.
  3. Give the new invoice an invoice number (if you don't have auto numbering switched on) and select the invoice customer.
  4. Now we have to allocate billable activity to the invoice. Click on the Invoice Line Items tab and then click the Get Invoice Line Items button.
  5. On the left hand side of the new window that will pop up you can see a project list. This is where you can choose to invoice one, many, or all of the projects for the selected customer. Just select the projects you want to invoice.
  6. Select the date range for the activity you are going to bill, and then click the Get Details button to get the billable activity. If you are happy with the details click the Accept Details button. You'll be taken back to the main Invoice screen now.
  7. If you are happy with the invoice you can now save it, and print it out for issuing to your customer.
So that's all there is to it. As usual please email us with any questions.

By Mark Nemtsas at 11:35 AM

A common question I am asked is whether you can use Timesheets Lite data with Timesheets MTS. The simple answer is no, the products are very different, the data used is very different, and the databases themselves are very different. However, I do have a tool I can use to upgrade the database for you. Here's what you need to do to get your Timesheets Lite database upgraded:

  1. Email me your Timesheets Lite database.
  2. The Timesheets Lite database can be found in c:\Program Files\Timesheets Lite\ unless you have moved it.  Ideally you should zip up the database with Winzip or something similar before emailing it.
  3. When we have received your database we will export all of the data from it into a brand new Timesheets MTS database.
  4. Within 24 hours we will email this new database back to you.  Just unzip it and copy it over your existing Timesheets MTS database.
  5. The Timesheets MTS database can be found in different locations depending on your version of Windows.  In Windows Vista you'll find it in c:\ProgramData\Timesheets MTS\Database.  In versions of Windows prior to Vista you'll find it in c:\Documents and Settings\All Users\Application Data\Timesheets MTS\Database . Of course in both cases if you've moved your database then it will be somewhere else.
  6. All Timesheets Lite projects will have equivalent projects created in Timesheets MTS.  Timeshets MTS tasks will be created for each Timesheets Lite Common Activity.  Time data not booked to a Common Activity in Timesheets Lite will be booked against a non allocated task in Timesheets MTS. All time activity booked against a common activity in Timesheets Lite will be booked against the corresponding task in Timesheets MTS.

That's all there is to it. If you do want to upgrade your Timesheets Lite database to try out Timesheets MTS then just let me know.


By Mark Nemtsas at 1:22 PM