The Timesheet |
| Contents Timesheets Lite Product Page Buy Timesheets Lite Now! |
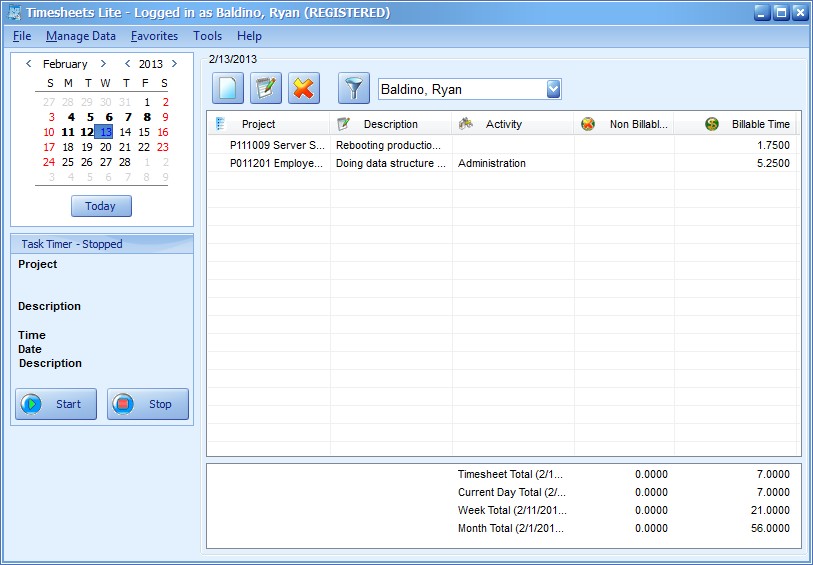
The timesheet screen in Timesheets Lite is the one that most employees will use for most of the time. Because of this it is designed to be both easy to use and able to perform many different tasks. Seen above the timesheet screen comprises six main areas.
The calendar at the top left indicates the current day that the timesheet is displaying. To select a different day's timesheet just click on a different date in the calendar. Days which have activity recorded against them are shown with bold text in the calendar. Employees can select multiple days on the calendar (by clicking and dragging over several days) and timesheet data from each of those days will be displayed on the timesheet. You can read more about this in the Selecting Multiple Days help topic. Employees can also click and drag times from the timesheet and drop them onto days on the calendar to copy the times to those days. You can read more about this in the Copying Times help topic.
The Task Timer can be seen on the bottom left of the timesheet screen. Details of the current task being timed are shown and buttons are provided to start the time, pause the timer, and stop the timer. The task timer can also be controlled from the Timesheets Lite icon in the Windows taskbar notifications area. You can read more about the Timesheets Lite task timer in the Task Timer help topic.
The timesheet toolbar comprises 4 buttons above the timesheet. These are, from left to right, the Add New Time button, the Edit Selected Time button, the Delete Selected Time button, and the Filter Visible Projects button. The functions of these buttons are covered in the Adding a Time help topic, the Editing a Time help topic, the Deleting a Time help topic and the Project Filter help topic.
To the right of the Timesheet Toolbar is the employee drop down. This can be used by employees who are super users to edit other employees timesheet. To do so just select the name of an employee from the drop down and that employees data will be displayed.
The timesheet shows all times for the day(s) selected on the timesheet calendar. The timesheet columns can be sorted by clicking on the column headers. The columns themselves can be re-arranged by clicking and dragging them to new positions. The timesheet also has a full right mouse button that includes functions to add, edit, and delete times, start the task timer, copy a time, paste a copied time, and full access to the favorite times features. As mentioned above one or more times can be clicked and dragged to other days on the timesheet calendar to either copy or move the times to that day.
The timesheet summary which is below the timesheet summarizes the times shown on the timesheet. This includes totals for billable and non-billable time for the timesheet, the current day, the current week, and the current month.